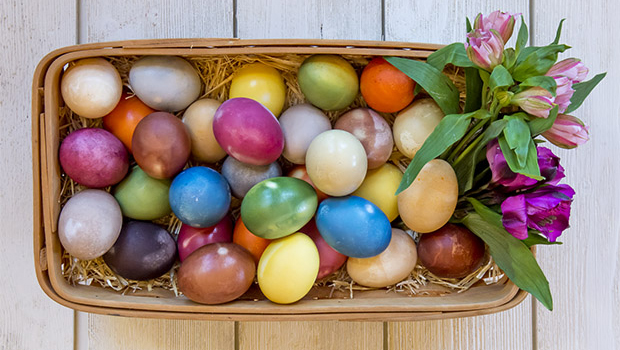
This holiday, use vegetables and spices for beautiful, colorful eggs.
Dyeing or decorating eggs at Easter is a time-honored tradition traced back to pagan rituals celebrating spring. Eggs, long considered a symbol of rebirth and fertility, were often incorporated into heathen celebrations and later adopted by Christians worldwide. Eggs traditionally were dyed red to symbolize the blood of Christ, but as time went on they were also dyed other colors using beets, onion skins and other natural dyes. You, too, can dye your Easter eggs the traditional way, using common vegetables and a few spices to create natural dyes. There’s no need for commercial dyes or food coloring—plus it’s both healthier and more economical.
Materials needed for each batch:
Wide-mouth pint Mason jar
3 white eggs
4 cups water
2 tablespoons white vinegar
Half of a cardboard egg carton or piece of paper towel (for drying eggs)
Vegetable or spice of your choice (see natural dye color chart, below)
Natural Dye Color Chart
Bright pink: 2 cups shredded beets
Pale pink: skins from two avocados or 2 cups chopped beet greens
Red: 2 cups red onion skins or 2 cups cranberry juice in place of water
Bright orange: 2 cups yellow onion skins
Pale orange: 2 tablespoons paprika
Yellow: 2 tablespoons turmeric
Bright green: 2 cups chopped red cabbage and 2 tablespoons turmeric
Pale green: 2 cups chopped spinach
Bright blue: 4 cups chopped purple cabbage
Purple: 2 cups fresh or frozen blueberries
Light brown: 2 cups strongly brewed black coffee in place of water
Bring a pot of water to boil and hard-boil the eggs for 20 minutes, then remove the eggs with a slotted spoon and carefully submerge them in a bowl of ice water until cool. While the eggs are cooling, add 4 cups of water to a small saucepan over medium-high heat (you will need a separate pot of water for each dye color). Add the dye ingredients of your choice to the pot and bring to a boil. Reduce the heat and let simmer until the water changes color; this will take 20 to 30 minutes, depending on your color.
Remove the saucepan from the heat and let the liquid cool. If you need to reuse the pot to make your next color, pour the contents into a bowl to cool. Once the liquid has cooled, strain out the solids, then add the vinegar.
Place the eggs in the Mason jar, then pour the strained liquid over the eggs, making sure they are covered completely. Leave the eggs to soak overnight in the fridge or until the shells become the desired color.
Quick tip: Hard-boil your eggs right in the dye water so by the time they’re cooked, the dye is ready. Then just strain out the solids, put the eggs into the Mason jars, pour over the dye, add the vinegar and refrigerate. Then continue as directed below once your eggs have achieved their desired color.
Carefully remove the eggs from the dye with a slotted spoon and place them in an egg carton or on a piece of paper towel on a cookie sheet to air dry. You can reuse the dye water to do another batch. Just pop three more eggs into each Mason jar. This time try leaving the eggs in for a bit shorter or longer time to get a slightly different result—removing eggs from the dye at various intervals will result in different shades of intensity. Once the eggs are completely dry, gently rub them with some coconut oil or olive oil and a soft cloth for a shiny finish. If you plan to eat the eggs, store them in the refrigerator, where they will last for up to a week.
For more on the amazing nutritional value of eggs, pick up the new issue of Live Happy, on newsstands now.


